Meetings: Recording and Playing your recording
From DurhamtechWiki
Jump to navigationJump to searchContents
- 1 Record, Playback, and Statistics Basics
- 1.1 Recording Setup
- 1.2 Starting and Stopping your Recording
- 1.3 Playback Requirements
- 1.4 What is recorded? Where is the Recording? How do I share it?
- 1.5 How do I view statistics about my meeting/participants?
- 1.6 Hiding and Showing Recordings
- 1.7 Protecting and Unprotecting Recordings (Private vs Public Recordings)
Record, Playback, and Statistics Basics
Meetings does record lectures easily and provides meeting and participant statistics!
- The recordings won't show up immediately, but short recordings show up fairly quickly. You can "Hide" Recordings (make recordings unavailable) to students, too.
Recording Setup
- When you create a meeting, you must click on the box beside Recording.
- Note: When you set up a meeting, you can also state it's duration, therefore, a meeting may also end when it reaches your stated meeting duration.
- The maximum length of a recording is 9 hours. (BigBlueButton)
Starting and Stopping your Recording
- How do you start a recording in your Meeting?
- At the top middle of Meetings, click on the Start Recording button.
- When does a recording start and stop?
- BigBlueButton will record the meeting from the time you press the record button to the time you press the record button again.
- You can start and stop the recording as many times as you like-only one recording will be created.
- After you End the meeting (not "Logout" of the meeting), the recording will be processed.
- Note: The maximum length of one meeting's recording is 9 hours.
Playback Requirements
- What web browsers play recordings?
- Firefox and Chrome can playback recordings, but Internet Explorer and Safari may not. (BigBlueButton)
Your presentation, polling, whiteboard and mouse movements, plus webcams, screen sharing, chat, as well as audio will be recorded (BigBlueButton).
- Note: The User Area is not recorded, but statistics are provided for each participant.
- When does a recording appear for review? It can take a few minutes, depending on how long your recording is, after you ended the meeting.
- Click on Meetings, Click on Recordings.
- To the right of your Meeting title, you can click on one of two links to view recordings of your meeting. Click on Presentation or video to review it.
- How do you Share Recordings?
- Click on Meetings, click on Recordings.
- Now you can direct students to the Meetings Recordings area link, or after clicking on the video link, you can copy the web address of the link and share it with your students. Due to FERPA, your video link will only work with your current students (if your course is copied, the link won't work).
How do I view statistics about my meeting/participants?
You have an extra link in the Playback column called Statistics that displays next to the Presentation and Video links.
- In Statistics, you'll see an Overview area, participant "Attention" graphs, and a list of Poll questions you can click on to see student results.
- You'll also see a a table listing all of the participant names, the exact times they joined and left the meeting and their "Activity Score".
- Within the Participant table, click on a student name, to see a graph representation of the exact time they were in the meeting, a list of their "Activity", and you'll see the student's answers to each poll question.
- For more details, view the video below:
- Can I download recordings?
- You can do this now, but we don't recommended it. Why not share the link to the video?
Hiding and Showing Recordings
- Can you hide a recording?
- In Meetings, in Recordings, below the recording title you'll see links you can click on to Hide or Delete the recording.
- After you click Hide, make sure the Status changes from Published to Unpublished. Now no one can see the recording (including the instructor).
- Can you make a hidden recording available again?
- Follow the steps above, but now you'll see a new link "Show" you can click on.
- After you click on Show, make sure the status changes back to Published.
Protecting and Unprotecting Recordings (Private vs Public Recordings)
- Can a student copy the link to a course Meetings recording and watch the video outside of Sakai?
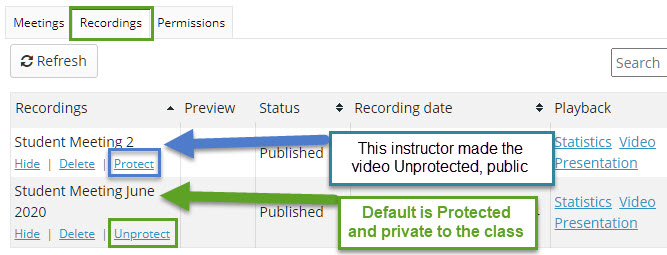
- Below a recording, in addition to the Hide and Delete links, you'll see an Unprotect link. As of June, 2020, by default, Meetings recordings are Protected and private.
- When a recording is Protected, or private, if a student copies the video recording's web address and tries to access it outside of Sakai, they won't be able to see the video. The student will have to logon to Sakai to be able to watch the video recording in your course.
- Can I make a Meetings recording available to anyone to watch?
- IMPORTANT: If your recording contains your current student's participation, it should ONLY be shared with your current students (due to FERPA). Think carefully about the reasons for making a recording public, that allows all students and people outside of the Sakai course to access the recording. Due to FERPA, if your course is imported or copied in the future, future students should NOT be able to see prior student's participation in your video recording.
- Below a recording, you can click on the Protect link, to change the recording to Unprotected and public.
- When a recording is Unprotected, or public, you or another student can share the video's web address, and anyone can watch the video. People outside of the Sakai course and those without a Sakai userid at Durham Tech can use the link to watch the video recording.

